
Spring Scheduler定时任务常用方法详解
1. 普通定时任务
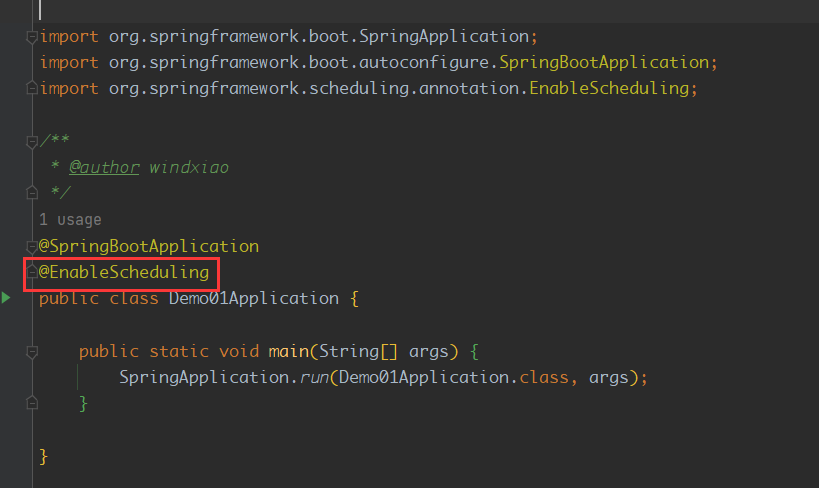
新建一个springboot项目,在启动类上添加注解@EnableScheduling
然后新建定时任务类
import lombok.extern.slf4j.Slf4j;
import org.springframework.scheduling.annotation.Scheduled;
import org.springframework.stereotype.Component;

import java.time.LocalDateTime;
import java.time.format.DateTimeFormatter;

@Component
@Slf4j
public class SimpleSchedule {
	public static final String YYYY_MM_DD_HH_MM_SS = "yyyy-MM-dd HH:mm:ss";

	@Scheduled(cron = "0/10 * * * * ? ")
	public void testScheduler() {
		log.info("定时任务开始时间: {}", LocalDateTime.now().format(DateTimeFormatter.ofPattern(YYYY_MM_DD_HH_MM_SS)));
		try {
			log.info("定时任务具体业务逻辑,模拟业务逻辑处理......");
			System.out.println("静态定时任务执行啦!!!!!!!");
			Thread.sleep(1000);
		} catch (InterruptedException e) {
			log.error("定时任务执行失败", e);
			Thread.currentThread().interrupt();
		}
		log.info("定时任务结束时间: {}", LocalDateTime.now().format(DateTimeFormatter.ofPattern(YYYY_MM_DD_HH_MM_SS)));
	}
}
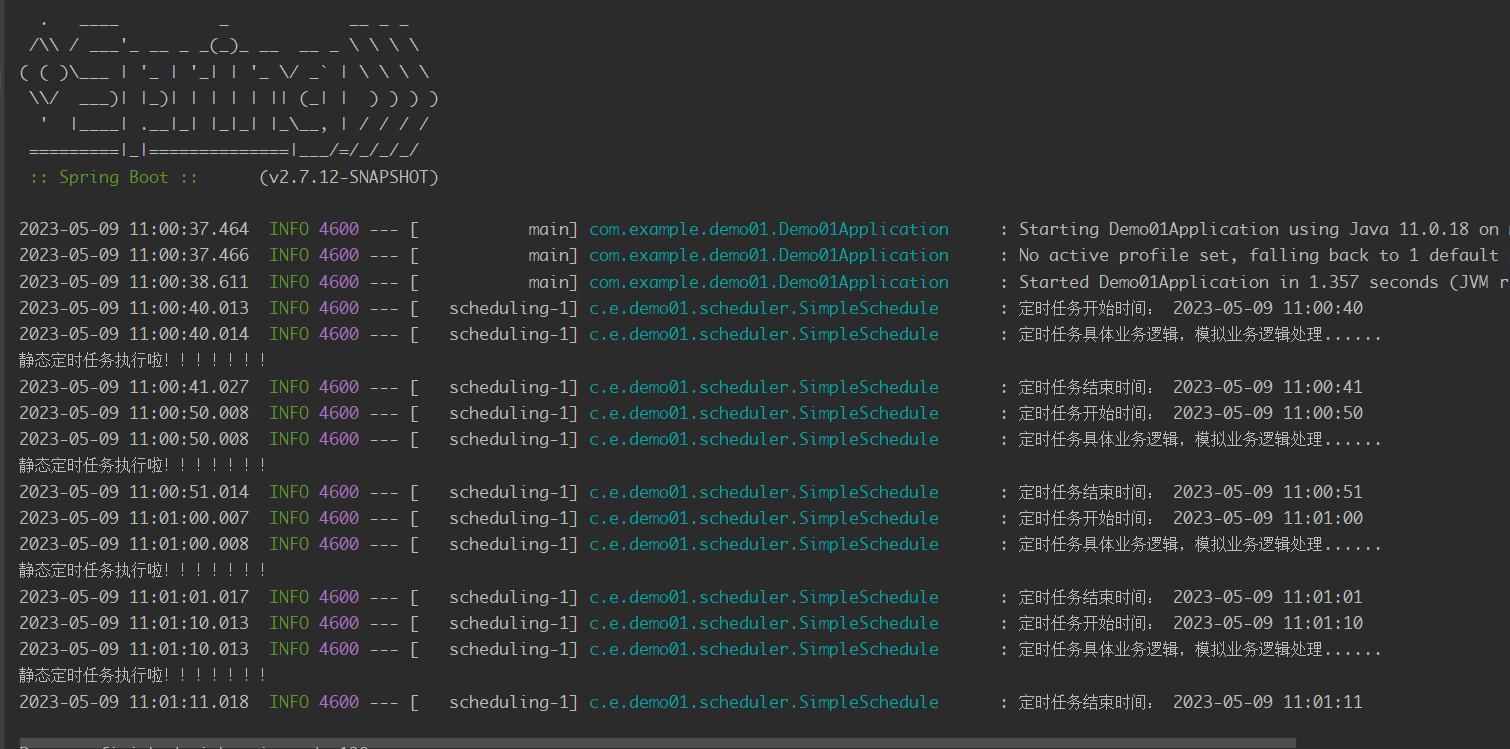
启动spring, 可以看到定时任务运行情况
2.动态定时任务
首先我们将SimpleSchedule类中的定时任务时间改一下
@Scheduled(cron = "0 0 1 * * ?")//每天晚上一点执行防止影响后面的日志查看。
在正常的使用中,难免会遇到需要修改定时设置的时候,这时候就需要动态定时任务,为了方便测试,我们先将cron表达式写在配置文件application.yml中
server:
  port: 8080

scheduler:
  # 定时任务的时间
  testCron: 0/10 * * * * ?
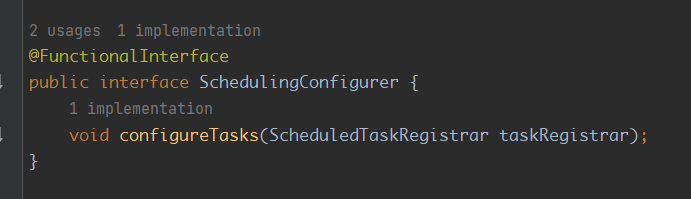
然后编写动态定时任务类,需要实现接口:org.springframework.scheduling.annotation.SchedulingConfigurer
从接口代码上看,其包含注解@FunctionalInterface是函数式接口,是可以使用lambda表达式来实现,我们实现他的代码
import lombok.Getter;
import lombok.Setter;
import lombok.extern.slf4j.Slf4j;
import org.springframework.beans.factory.annotation.Value;
import org.springframework.scheduling.annotation.SchedulingConfigurer;
import org.springframework.scheduling.config.ScheduledTaskRegistrar;
import org.springframework.scheduling.support.CronTrigger;
import org.springframework.stereotype.Component;

import java.time.LocalDateTime;
import java.time.format.DateTimeFormatter;

/**
 * @author windxiao
 */
@Component
@Slf4j
@Getter
@Setter
public class ConfigSchedule implements SchedulingConfigurer {

    public static final String YYYY_MM_DD_HH_MM_SS = "yyyy-MM-dd HH:mm:ss";

    @Value("${scheduler.testCron}")
    private String testCron;

    @Override
    public void configureTasks(ScheduledTaskRegistrar taskRegistrar) {
        // 使用cron表达式可以动态地设置循环间隔
        taskRegistrar.addTriggerTask(() -> {
            log.info(">>>>>>动态定时任务开始时间: {}", LocalDateTime.now().format(DateTimeFormatter.ofPattern(YYYY_MM_DD_HH_MM_SS)));
            try {
                // 定时任务具体业务逻辑,模拟业务逻辑处理
                log.info("动态定时任务具体业务逻辑,模拟业务逻辑处理......");
                System.out.println("动态定时任务执行啦!!!!!!!");
                Thread.sleep(1000);
            } catch (InterruptedException e) {
                log.error("动态定时任务处理失败", e);
                Thread.currentThread().interrupt();
            }
            log.info(">>>>>>动态定时任务结束时间: {}", LocalDateTime.now().format(DateTimeFormatter.ofPattern(YYYY_MM_DD_HH_MM_SS)));
        }, triggerContext -> {
            // 使用CronTrigger触发器,可动态修改cron表达式来操作循环规则
            CronTrigger cronTrigger = new CronTrigger(testCron);
            return cronTrigger.nextExecutionTime(triggerContext);
        });
    }
}
因为要动态设置,我们给他写一个controller来实现动态设置
import com.example.demo01.scheduler.ConfigSchedule;
import lombok.extern.slf4j.Slf4j;
import org.springframework.beans.factory.annotation.Autowired;
import org.springframework.web.bind.annotation.GetMapping;
import org.springframework.web.bind.annotation.RequestMapping;
import org.springframework.web.bind.annotation.RequestParam;
import org.springframework.web.bind.annotation.RestController;


/**
 * @author windxiao
 */
@Slf4j
@RestController
@RequestMapping("scheduler")
public class ScheduleController {

    @Autowired
    ConfigSchedule configSchedule;


    @GetMapping("/set")
    public void setCron(@RequestParam("cron") String cron) {
        configSchedule.setTestCron(cron);
    }
}
用controller记得导入
spring-boot-starter-web模块
然后我们启动项目
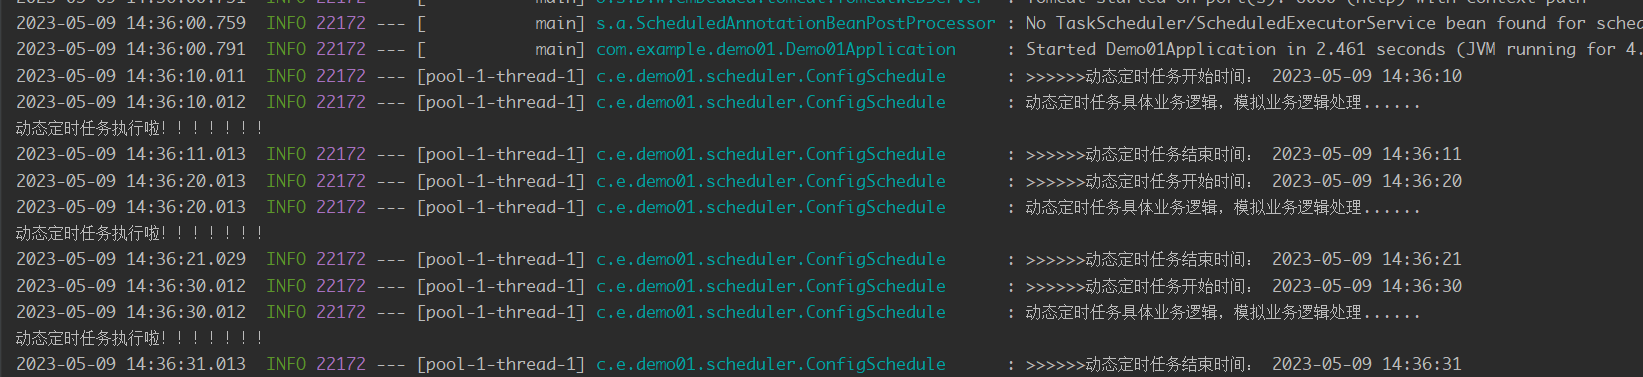
可以看到,启动后每10s执行一次,我们通过postman修改时间
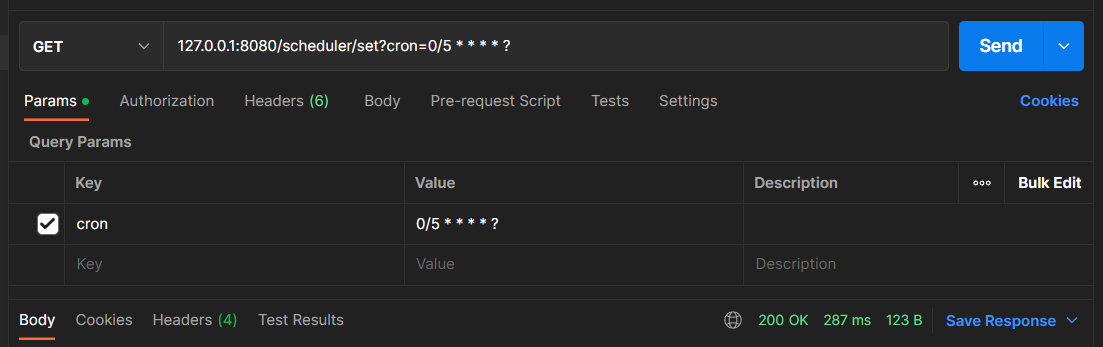
再看后台日志
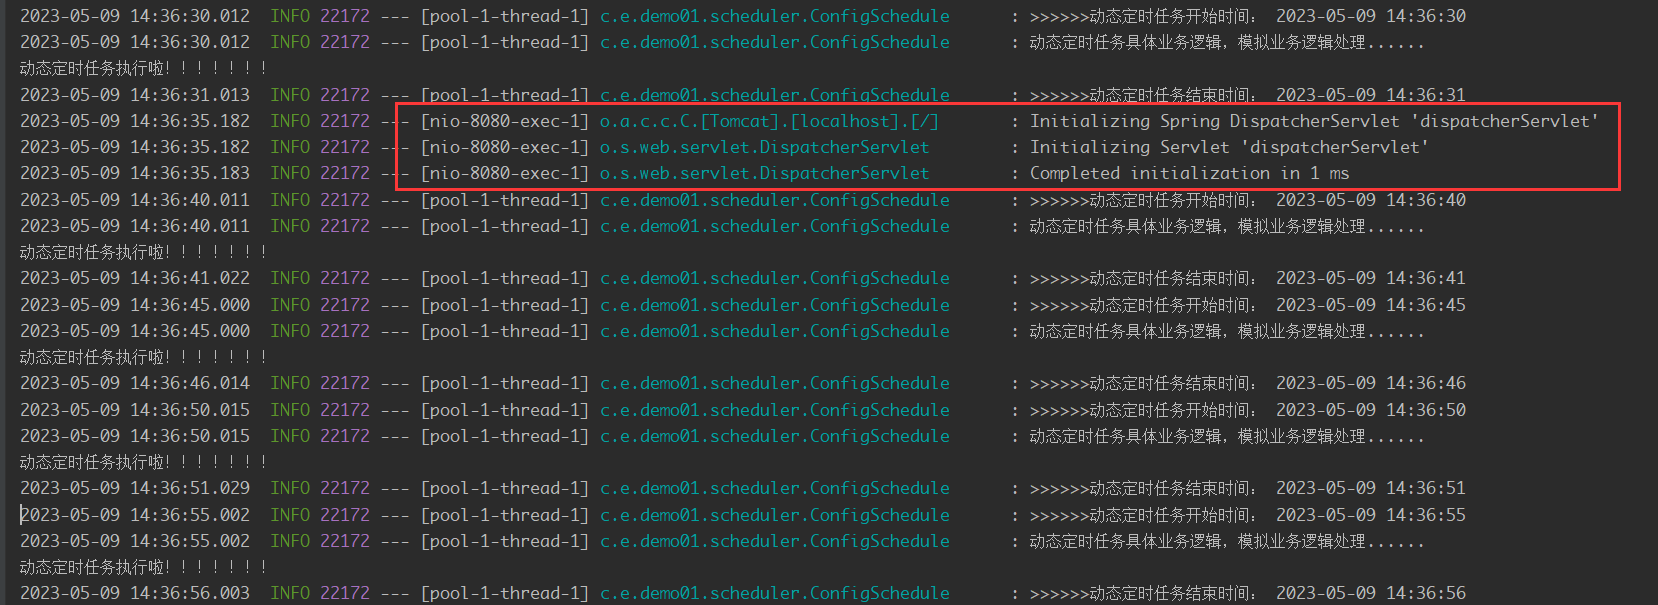
发现定时任务已经被修改为5s执行一次
3.同步的定时任务
首先我们还是将上一个定时任务时间换一下,换成
0 0 1 * * ?
我们在一个类中添加两个定时任务,一个每15秒执行一次,假设他要执行10秒; 第二个每3秒执行一次,代码如下:
import lombok.extern.slf4j.Slf4j;
import org.springframework.scheduling.annotation.Scheduled;
import org.springframework.stereotype.Component;

import java.text.SimpleDateFormat;
import java.util.Date;

/**
 * @author windxiao
 */
@Slf4j
@Component
public class BlockSchedule {

    /**
     * 定时任务1,每15秒执行一次,会执行10秒(造成10秒阻塞)
     * @throws InterruptedException InterruptedException
     */
    @Scheduled(cron = "0/15 * * * * ?")
    public void taskCron1() throws InterruptedException {
        SimpleDateFormat dateFormat = new SimpleDateFormat("HH:mm:ss");
        log.info("taskCron1 - 执行定时任务【0/15 * * * * ?】,时间: " + dateFormat.format(new Date()));
        //模拟延时
        Thread.sleep(10*1000);
    }


    /**
     * 定时任务2,每3秒执行一次
     */
    @Scheduled(cron = "0/3 * * * * ?")
    public void taskCron2(){
        SimpleDateFormat dateFormat = new SimpleDateFormat("HH:mm:ss");
        log.info("taskCron2 - 执行定时任务【0/3 * * * * ?】,时间: " + dateFormat.format(new Date()));
    }
}
先想一想,这段代码的执行结果。
然后我们在看他的执行结果:

在日志里能看到,先执行了taskCron1,然后等taskCron1的10s执行完成后,才执行的taskCron2,taskCron2在taskCron1执行时被阻塞了,没能执行,那在这种情况下,我们怎么才能让taskCron2正常执行呢? 解决方案就是并发处理定时任务,每个线程执行一个定时任务,那自然不会阻塞,所以我们创建一个线程池,并且把他注册到spring容器中,代码如下:
import lombok.extern.slf4j.Slf4j;
import org.springframework.context.annotation.Bean;
import org.springframework.context.annotation.Configuration;
import org.springframework.scheduling.annotation.EnableAsync;
import org.springframework.scheduling.concurrent.ThreadPoolTaskExecutor;

import java.util.concurrent.Executor;
import java.util.concurrent.ThreadPoolExecutor;

/**
 * @author windxiao
 */
@Slf4j
@EnableAsync
@Configuration
public class ScheduleThreadPool {

    @Bean(name = "asyncScheduleServiceExecutor")
    public Executor asyncScheduleServiceExecutor() {

        // SpringBoot项目,可使用Spring提供的对 ThreadPoolExecutor 封装的线程池 ThreadPoolTaskExecutor:
        ThreadPoolTaskExecutor executor = new ThreadPoolTaskExecutor();

        // 配置核心线程数
        executor.setCorePoolSize(5);

        // 配置最大线程数
        executor.setMaxPoolSize(10);

        // 配置队列大小
        executor.setQueueCapacity(20);

        // 配置线程池中的线程的名称前缀(方便排查问题)
        executor.setThreadNamePrefix("async-scheduler-service-");

        // 配置线程拒绝策略
        // rejection-policy:当pool已经达到max size的时候,如何处理新任务
        // 1.CallerRunsPolicy:不在新线程中执行任务,而是由调用者所在的线程来执行。
        //   "该策略既不会抛弃任务,也不会抛出异常,而是将任务回推到调用者。"顾名思义,在饱和的情况下,调用者会执行该任务(而不是由多线程执行)
        // 2.AbortPolicy:拒绝策略,直接拒绝抛出异常
        // 3.DiscardPolicy:丢弃任务,但是不抛出异常。可以配合这种模式进行自定义的处理方式
        // 4.DiscardOldestPolicy:丢弃队列最早的未处理任务,然后重新尝试执行任务
        executor.setRejectedExecutionHandler(new ThreadPoolExecutor.CallerRunsPolicy());

        //执行初始化
        executor.initialize();

        return executor;
    }

}
上面的代码使用了@EnableAsync注解,这个注解是Spring提供的,当线程池被这个注解标记后,这个线程池就开始了异步支持,再给其他需要异步支持的方法上添加@Async即可。
线程池创建之后,我们就需要修改BlockSchedule中的方法,给taskCron1()和taskCron2()添加@Async(value = "asyncScheduleServiceExecutor")
@Async(value = "asyncScheduleServiceExecutor")
@Scheduled(cron = "0/15 * * * * ?")
public void taskCron1() throws InterruptedException {
    SimpleDateFormat dateFormat = new SimpleDateFormat("HH:mm:ss");
    log.info("taskCron1 - 执行定时任务【0/15 * * * * ?】,时间: " + dateFormat.format(new Date()));
    //模拟延时
    Thread.sleep(10*1000);
}

@Async(value = "asyncScheduleServiceExecutor")
@Scheduled(cron = "0/3 * * * * ?")
public void taskCron2(){
    SimpleDateFormat dateFormat = new SimpleDateFormat("HH:mm:ss");
    log.info("taskCron2 - 执行定时任务【0/3 * * * * ? 】,时间: " + dateFormat.format(new Date()));
}
然后再执行,看日志的结果:
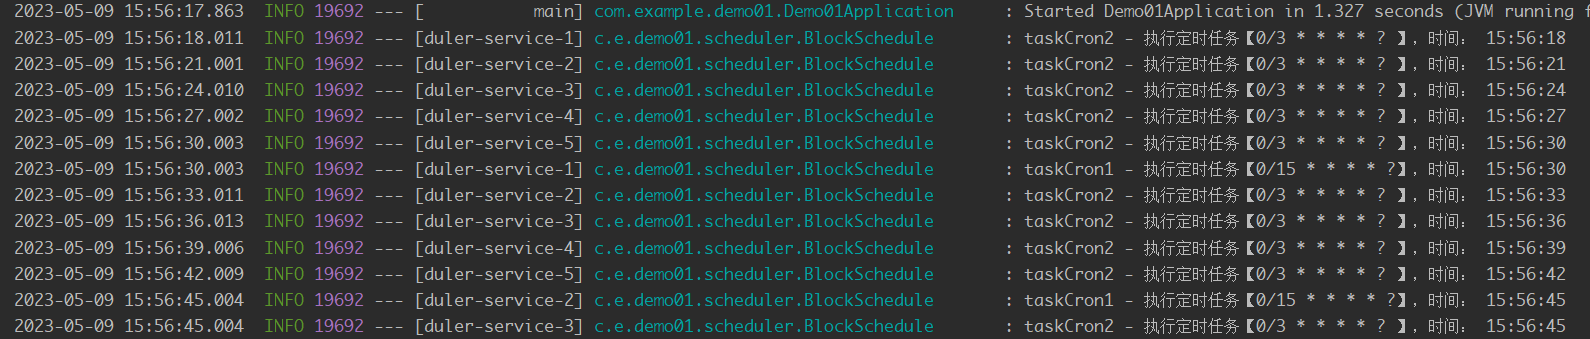 如图可见,两个定时任务都在正常运行,没有阻塞的情况。

